🌿 My Smart Garden: ESPHome Hardware, Node-RED Logic, and Beautiful Dashboards
Building a “Zero-Cloud” Smart Garden: A Complete Guide to ESPHome, Node-RED, and Home Assistant
Building a smart home often involves a trade-off: simplicity vs. flexibility. Commercial systems are easy but locked into the cloud. DIY systems using raw code are flexible but fragile.
For my latest project—a Smart Garden Watering System—I built a setup that separates concerns perfectly:
- Hardware Layer: An ESP32 running ESPHome handles the physical sensors and relays. It’s fast, local, and reliable.
- Logic Layer: Node-RED handles the complex “If/Then” rules (e.g., “Water if dry AND not raining AND before 8 PM”).
- Option A: Run Node-RED in a Kubernetes cluster for maximum scalability and isolation (my current setup).
- Option B: Run Node-RED as a Home Assistant Add-on for ultimate simplicity.
- Visualization Layer: Home Assistant provides the beautiful dashboard and the central entity database.
The result? A system that works even if the internet goes down, is easy to modify without re-flashing hardware, and looks stunning on my phone.
In this deep-dive guide, I’ll walk you through every step of this architecture, including how to choose the right Node-RED deployment for your needs.
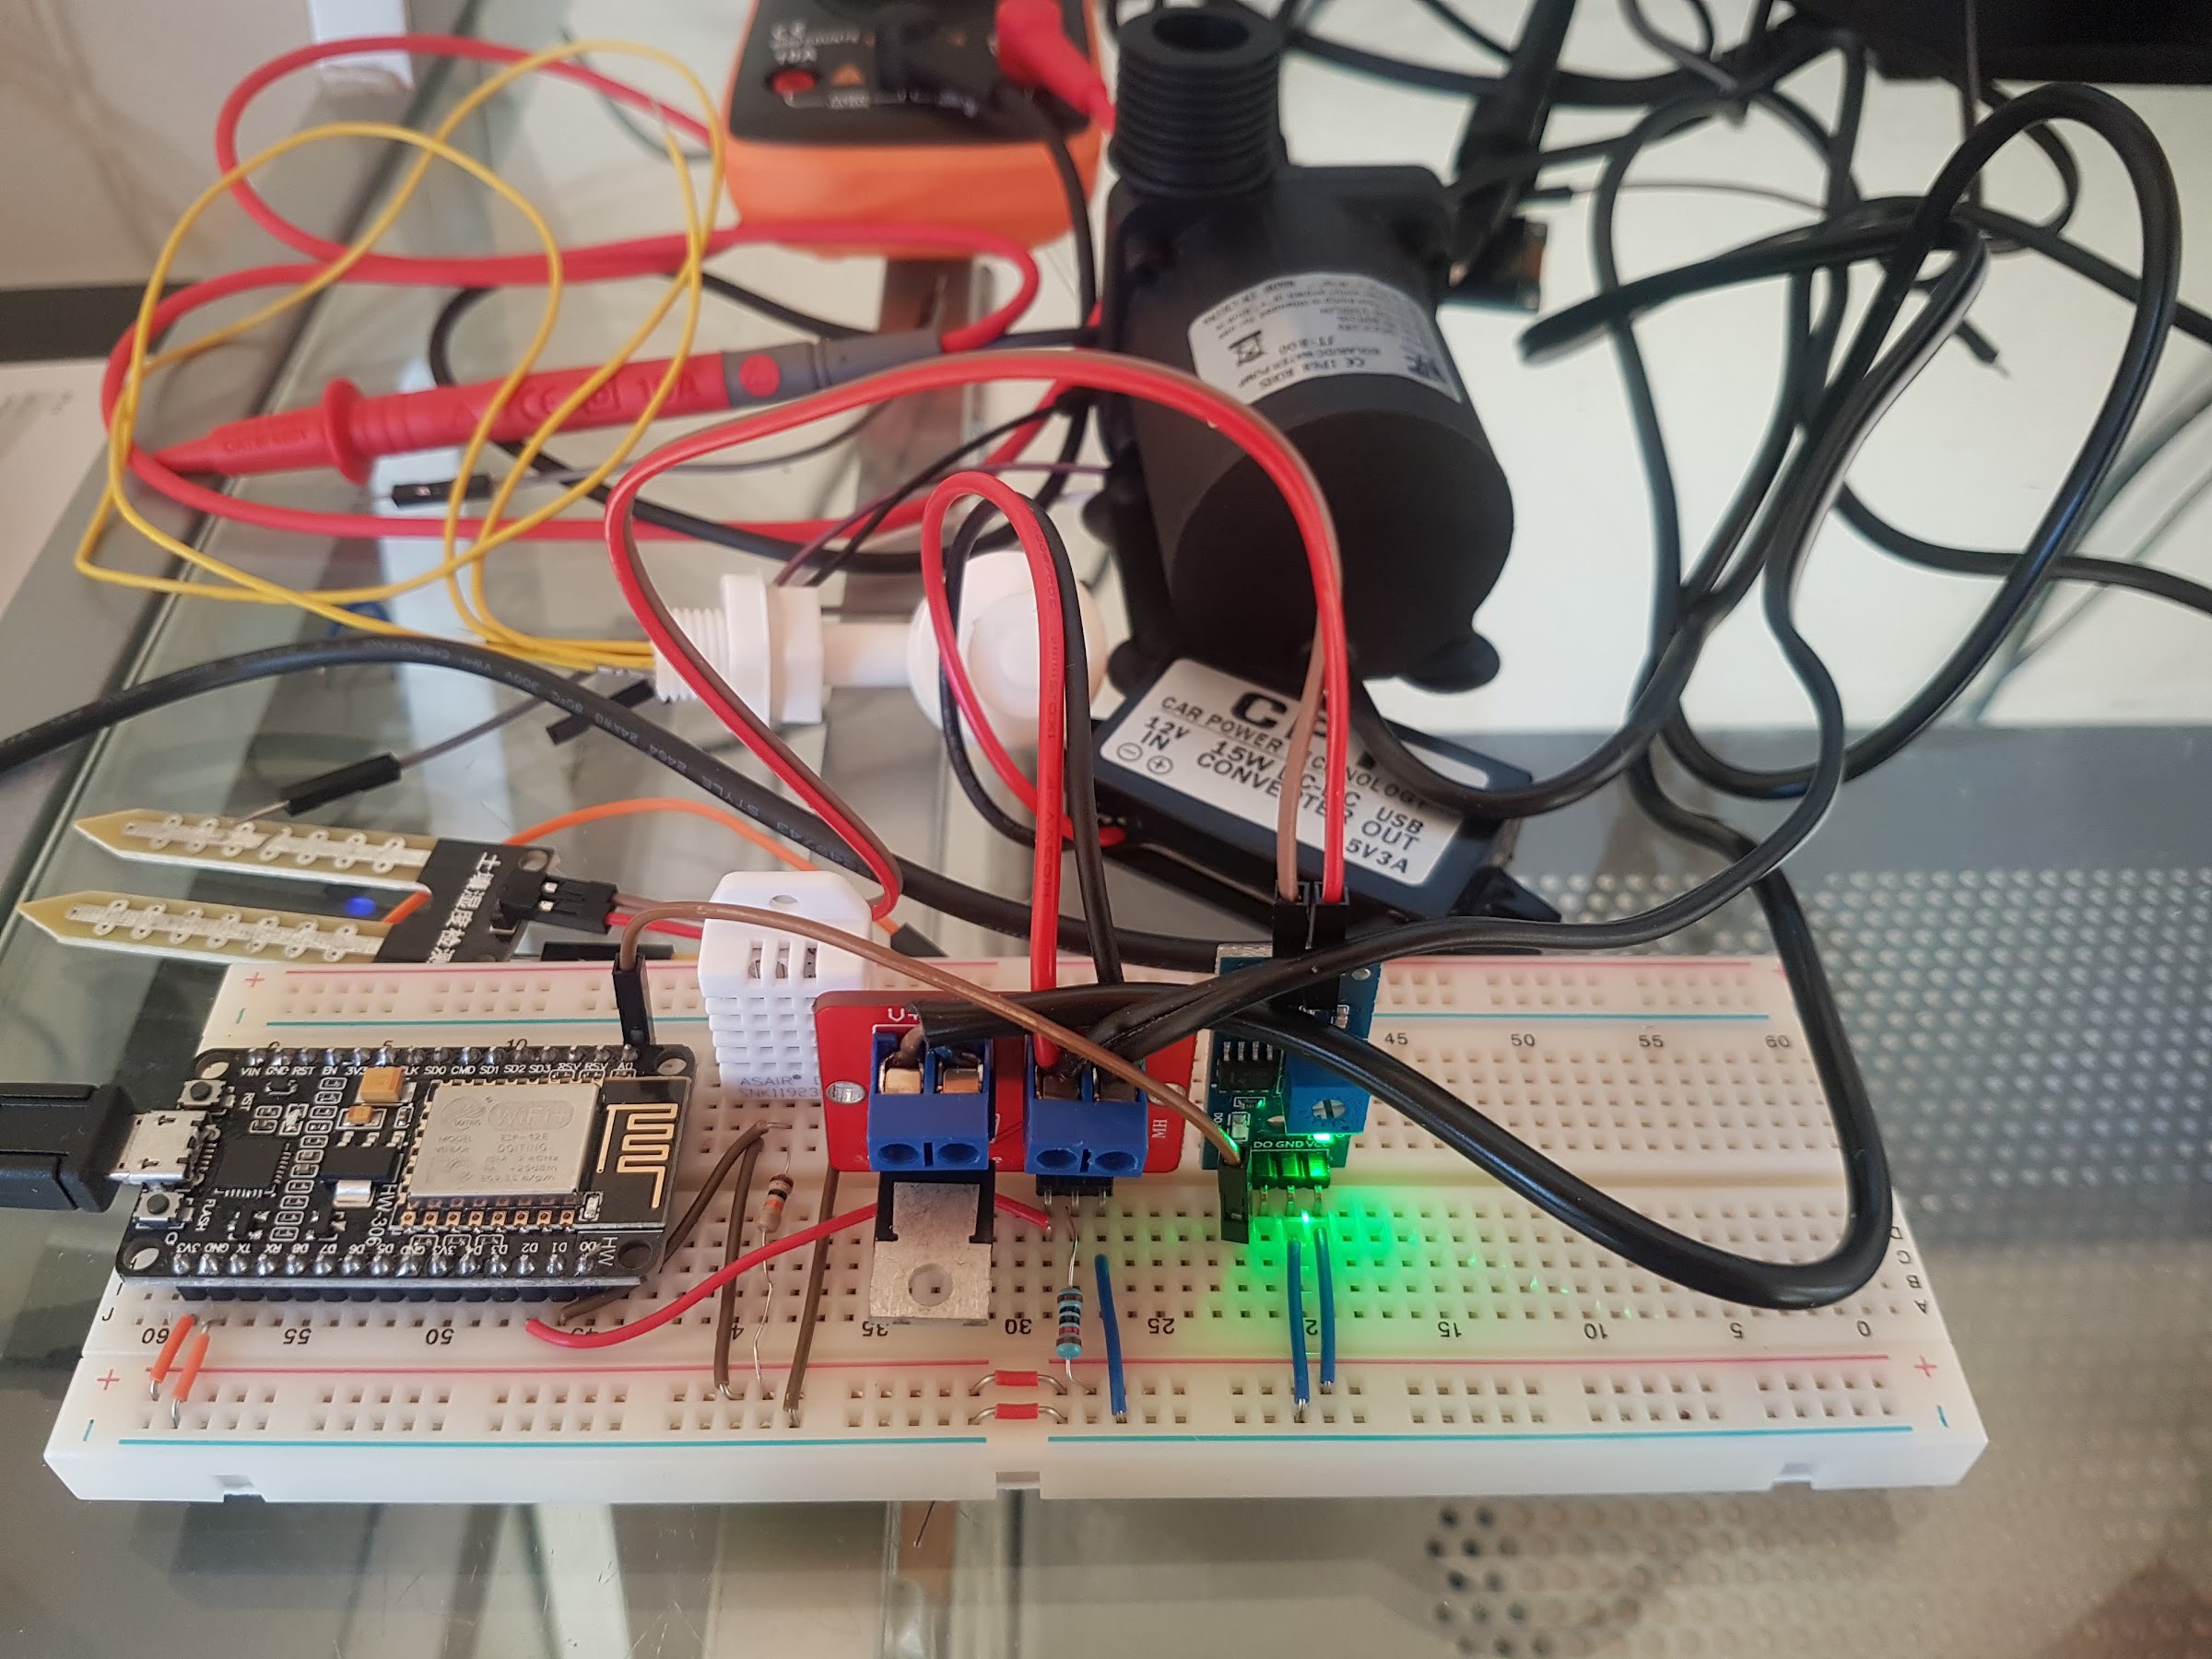
🛠️ Part 1: The Hardware & ESPHome Configuration
The Components
Here’s what you’ll need for this project:
- Microcontroller: ESP32 DevKit V1 (Wi-Fi + Bluetooth) — ~$8
- Sensor: Capacitive Soil Moisture Sensor (V1.2) — Crucial: Avoid resistive sensors to prevent corrosion.
- Actuator: 12V DC Water Pump + Relay Module (or MOSFET)
- Power: 5V USB for ESP32, separate 12V supply for the pump
- Wiring: Female-to-Female jumper wires
Total cost: Around $25-30, which is significantly cheaper than commercial smart irrigation systems.
Step 1: The ESPHome Builder
Instead of writing C++ code or editing YAML files manually on your hard drive, I use the ESPHome Builder add-on inside Home Assistant. This provides a visual interface to build the firmware.
Go to Settings > Devices & Services > ESPHome in Home Assistant.
Click Add Device and name it
garden_watering.Select the ESP32 Board (
esp32dev).Add Components via the visual menu:
Sensor:
- Select ADC (Analog to Digital Converter).
- Pin:
34(GPIO 34 is an analog input on ESP32). - Name:
Garden Soil Moisture. - Unit of Measurement:
%. - Device Class:
moisture.
Switch:
- Select GPIO.
- Pin:
2(This will control the relay). - Name:
Garden Pump. - Restore Mode:
RESTORE_DEFAULT_OFF(This is critical: it ensures the pump stays OFF if power is lost or the ESP32 reboots).
Step 2: The Under-the-Hood YAML
Even with the visual builder, understanding the generated code helps with debugging. The Builder creates a configuration that enables MQTT Discovery.
esphome:
  name: garden_watering
  friendly_name: Garden Watering System

esp32:
  board: esp32dev
  framework:
    type: esp-idf

wifi:
  ssid: !secret wifi_ssid
  password: !secret wifi_password

# Enable MQTT to talk to the Mosquitto Broker
mqtt:
  broker: !secret mqtt_broker
  username: !secret mqtt_user
  password: !secret mqtt_pass

# --- SENSORS ---
sensor:
  - platform: adc
    pin: 34
    name: "Garden Soil Moisture"
    unit_of_measurement: "%"
    device_class: "moisture"
    accuracy_decimals: 0
    # Calibration: Adjust this multiplier later based on your sensor's dry/wet readings
    filters:
      - multiply: 0.0244
    update_interval: 30s

# --- SWITCHES ---
switch:
  - platform: gpio
    pin: 2
    name: "Garden Pump"
    id: pump_switch
    restore_mode: RESTORE_DEFAULT_OFF
Key Configuration Notes:
multiply: 0.0244— This calibration factor converts the raw ADC value (0-4095) to a percentage. You’ll need to adjust this based on your specific sensor.update_interval: 30s— I only need to read the sensor every 30 seconds to avoid unnecessary power consumption.
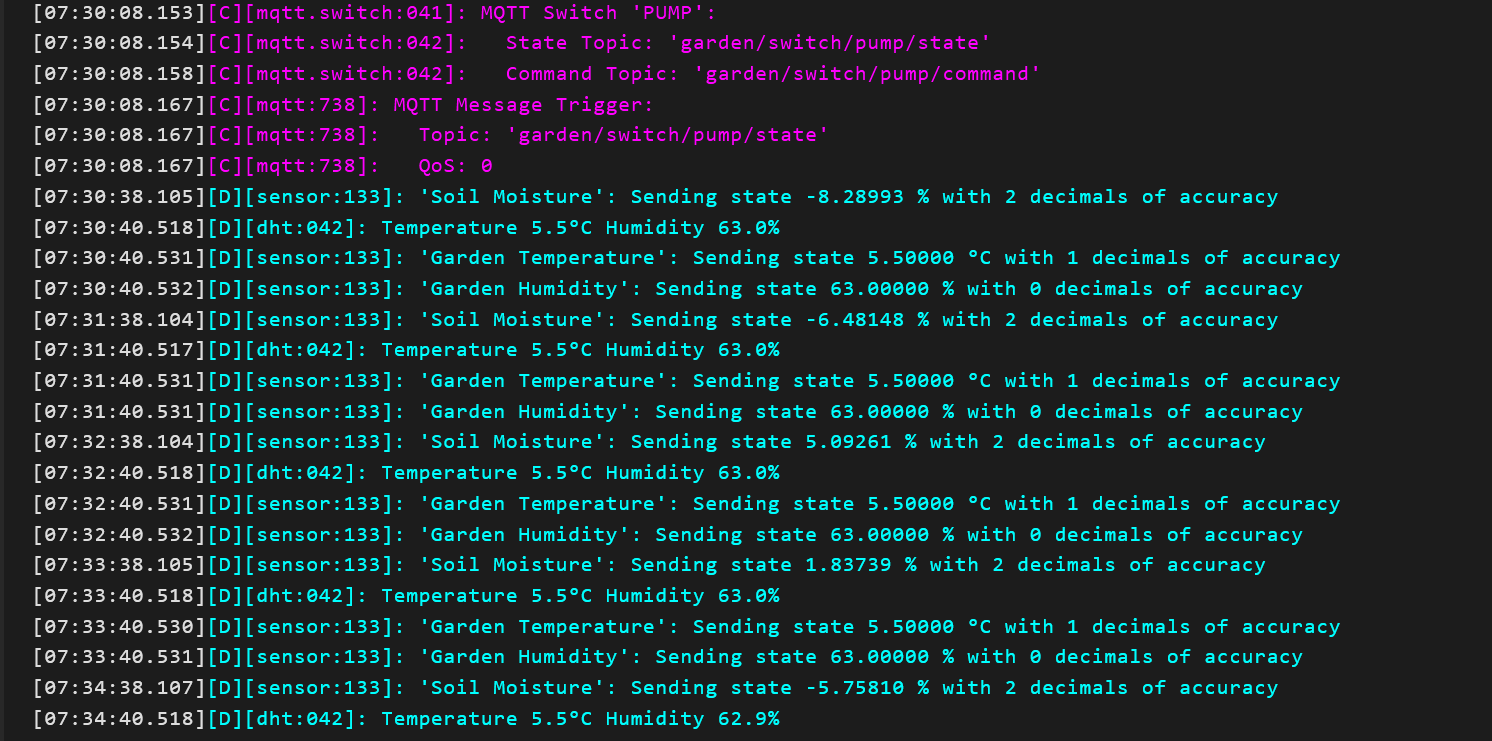
Step 3: Flash and Discover
- Click Build & Flash in the ESPHome interface.
- Wait for the process to complete (this may take a few minutes).
- Result: Home Assistant automatically discovers the new entities via the Mosquitto Broker.
You should now see two new entities in Home Assistant:
sensor.garden_soil_moistureswitch.garden_pump
No manual YAML entity definitions in Home Assistant were required!
🧩 Part 2: The Logic Layer (Node-RED Deployment Options)
This is where you have a choice based on your technical comfort level.
Option A: The “Pro” Setup (Kubernetes Pod)
As used in my personal lab.
Pros:
- Runs in a separate cluster, isolated from HA crashes
- Highly scalable
- Uses the
node-red-contrib-home-assistant-websocketnode for direct API access - Can share Node-RED instances across multiple Home Assistant instances
Cons:
- Requires Kubernetes knowledge and network configuration
- More complex to set up and maintain
Option B: The “Simple” Setup (Home Assistant Add-on)
Recommended for beginners or those who want a “set it and forget it” solution.
Pros:
- Zero Network Config: The Node-RED Add-on is already on the same internal network as Home Assistant. No IP addresses or firewalls to worry about.
- Native Integration: The “Home Assistant” nodes inside the Add-on are pre-configured to connect automatically. You don’t need to enter usernames/passwords or worry about WebSocket URLs.
- Easy Updates: Updates happen right inside the Home Assistant interface.
Cons:
- If the Add-on crashes, it might restart your HA instance (rare, but possible)
The Logic is Identical:
Regardless of which option you choose, the Node-RED flow logic remains exactly the same. You simply import the JSON flow (provided below) and the connection node will either auto-connect (Add-on) or require a manual URL (K8s).
Recommendation: If you are just starting out, choose Option B. It saves hours of networking configuration and lets you focus on the garden logic immediately.
The Node-RED Flow
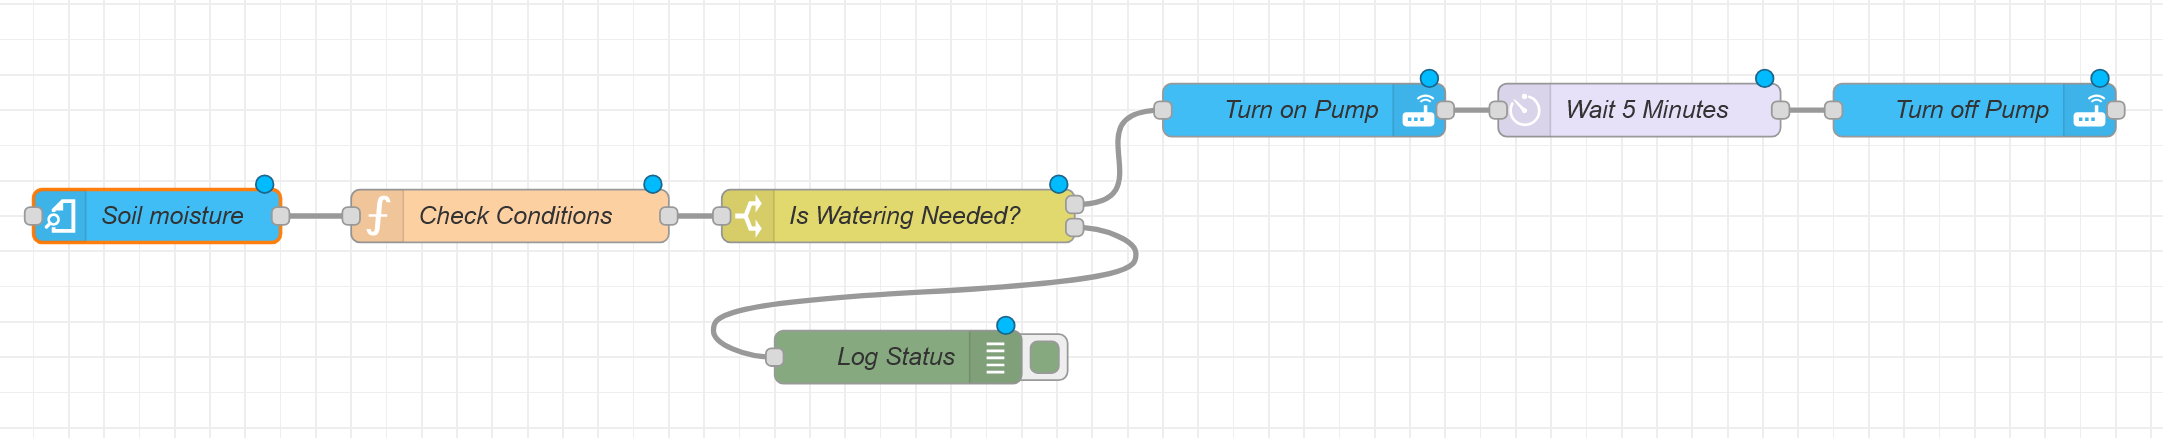
Here’s the complete Node-RED flow JSON. You can import this directly into your Node-RED instance:
[
  {
    "id": "trigger_node",
    "type": "ha-event",
    "name": "Soil Moisture Change",
    "event": "state_changed",
    "filter": {
      "entityId": "sensor.garden_soil_moisture"
    },
    "x": 150,
    "y": 100,
    "wires": [["logic_node"]]
  },
  {
    "id": "logic_node",
    "type": "function",
    "name": "Watering Logic",
    "func": "var moisture = parseFloat(msg.payload.state);\nvar now = new Date();\nvar hour = now.getHours();\n\n// Configuration\nvar dryThreshold = 30;\nvar startHour = 6;\nvar endHour = 20;\n\n// Logic\nif (moisture < dryThreshold && hour >= startHour && hour < endHour) {\n    msg.shouldWater = true;\n    msg.log = \"Watering needed: \" + moisture + \"%\";\n} else {\n    msg.shouldWater = false;\n    msg.log = \"Condition not met. Moisture: \" + moisture + \"% | Hour: \" + hour;\n}\nreturn msg;",
    "outputs": 1,
    "x": 350,
    "y": 100,
    "wires": [["switch_node"]]
  },
  {
    "id": "switch_node",
    "type": "switch",
    "name": "Should Water?",
    "property": "shouldWater",
    "propertyType": "msg",
    "rules": [
      { "t": "bool", "v": true, "vt": "bool" },
      { "t": "bool", "v": false, "vt": "bool" }
    ],
    "checkall": "true",
    "repair": false,
    "outputs": 2,
    "x": 550,
    "y": 100,
    "wires": [["water_action"], ["log_node"]]
  },
  {
    "id": "water_action",
    "type": "ha-service",
    "name": "Turn Pump ON",
    "service": "switch.turn_on",
    "entityId": "switch.garden_pump",
    "x": 750,
    "y": 100,
    "wires": [["delay_node"]]
  },
  {
    "id": "delay_node",
    "type": "delay",
    "name": "Wait 5 Minutes",
    "delaytime": "5",
    "timetype": "min",
    "x": 950,
    "y": 100,
    "wires": [["off_action"]]
  },
  {
    "id": "off_action",
    "type": "ha-service",
    "name": "Turn Pump OFF",
    "service": "switch.turn_off",
    "entityId": "switch.garden_pump",
    "x": 1150,
    "y": 100,
    "wires": []
  },
  {
    "id": "log_node",
    "type": "debug",
    "name": "Log Status",
    "x": 750,
    "y": 200,
    "wires": []
  }
]
Flow Breakdown:
1. The Trigger
- Node: Home Assistant (Trigger)
- Entity:
sensor.garden_soil_moisture - Condition: State changes
- Why? I don’t want to check every second; I only want to react when the data actually changes.
2. The Logic Check (Function Node)
This is where the “brain” lives. It checks three conditions:
- Is the soil dry? (e.g.,
< 30%) - Is it daytime? (e.g., between 6:00 AM and 8:00 PM)
- Is the pump currently OFF? (To prevent re-triggering)
The function node outputs a message with shouldWater set to true or false based on these conditions.
3. The Action (Switch & Service Calls)
- Switch Node: Routes the flow to “Water” or “Log” based on
shouldWater. - Action (Water):
- Node: Home Assistant (Service Call)
- Service:
switch.turn_on - Entity:
switch.garden_pump
- Delay: Wait 5 minutes.
- Action (Off):
- Node: Home Assistant (Service Call)
- Service:
switch.turn_off - Entity:
switch.garden_pump
Configuration Notes:
- If using the HA Add-on: The “Home Assistant” node will automatically detect the connection. Just ensure the Add-on is installed and running.
- If using K8s: You must configure the “Home Assistant” node with your server IP (
homeassistant.localor IP), port (8123), username, and password.
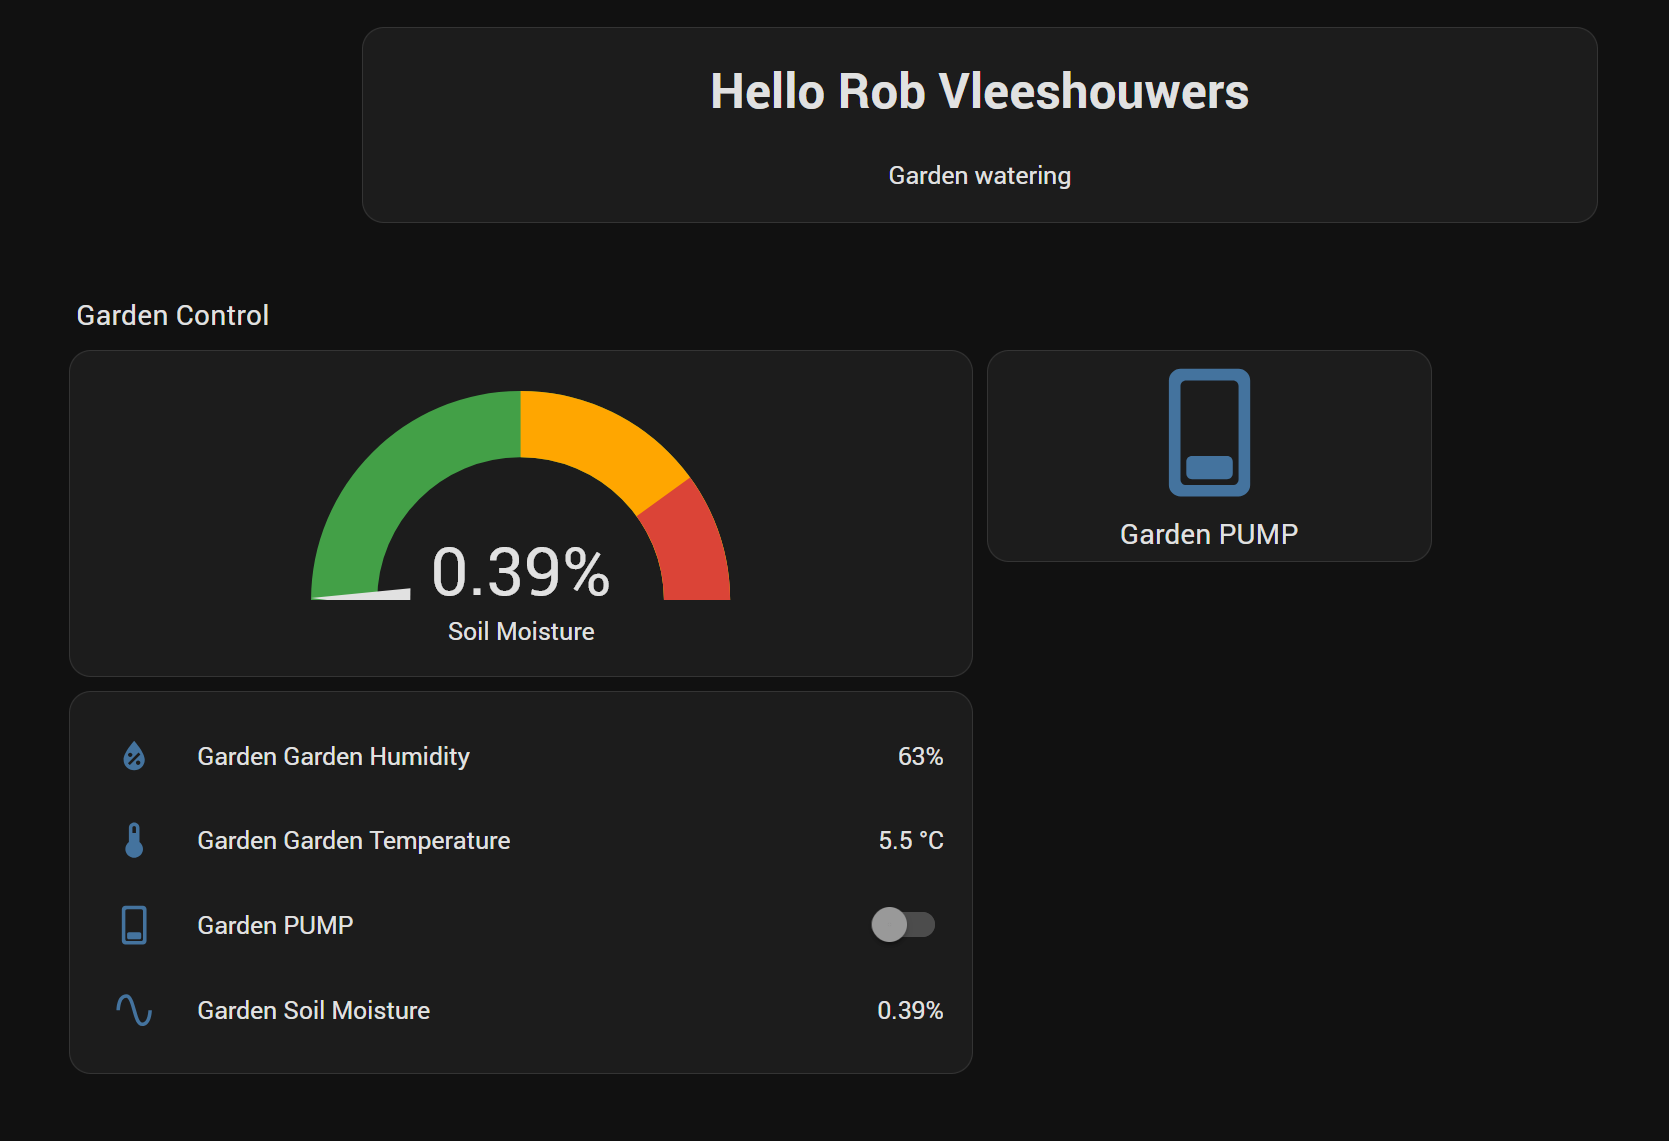
🎨 Part 3: The Home Assistant Dashboard
Now that the hardware and logic are working, let’s build a dashboard that makes the system feel premium.
Go to: Settings > Dashboards > Create Dashboard > Name it “Garden Control”.
1. The Soil Moisture Gauge
Visual feedback is essential.
- Card Type: Gauge
- Entity:
sensor.garden_soil_moisture - Configuration:
- Min/Max: 0 to 100
- Colors:
- Red: 0–30% (Critical)
- Yellow: 30–60% (Warning)
- Green: 60–100% (Happy)
- Icon: A leaf or water drop
2. The Manual Override Button
Sometimes you want to water immediately, regardless of the logic.
- Card Type: Button (or Toggle)
- Entity:
switch.garden_pump - Label: “Water Now”
- Visuals: Use a Button Card (from the UI) to add a blue animation when the pump is active.
3. The Status Summary
A quick glance card for the main entities.
- Card Type: Entities
- Entities:
sensor.garden_soil_moisture,switch.garden_pump - Title: “Current Status”
4. The History Graph
To see trends over time.
- Card Type: History Graph
- Entity:
sensor.garden_soil_moisture - Time Range: Last 7 Days
- View: Watch the natural moisture drop during the day and the spikes when the pump runs.
🌟 Why This Architecture Wins
| Feature | Traditional DIY | Commercial Cloud | My ESPHome + Node-RED Setup |
|---|---|---|---|
| Reliability | Low (Code bugs) | Medium (Server outages) | High (Local, no internet needed) |
| Flexibility | High (Hard to edit) | Low (Fixed features) | Very High (Visual Node-RED logic) |
| Privacy | High | Low (Data in cloud) | High (All local) |
| Setup | Hard (C++/Python) | Easy | Medium (But very powerful) |
Key Benefits
- Hardware Stability: The ESP32 firmware is simple. It just reads and writes. It doesn’t care about complex weather APIs.
- Logic Flexibility: If I want to add a “Rain Delay” or “Wind Speed” check, I just add a node in Node-RED. No need to re-flash the ESP32.
- Scalability: Adding a second zone is as easy as adding another ESP32 and a new flow in Node-RED.
- Visual Control: The Home Assistant dashboard gives me a single point of truth for everything.
🚀 Next Steps & Calibration
1. Calibrate Your Sensor
The multiply factor in the ESPHome YAML is critical.
- Dry Soil: Read the value (e.g., 3000)
- Wet Soil: Read the value (e.g., 1000)
- Calculation: Adjust the
multiplyfilter in the YAML to map these values to 0% and 100%.
Example: If 4095 is 100%, multiply = 0.0244.
2. Add Safety Features
- Max Duration: In Node-RED, add a check to ensure the pump never runs longer than, say, 10 minutes, even if the sensor fails.
- Rain Sensor: Add a second sensor to the ESP32 to skip watering when it rains.
3. Expand Your Dashboard
- Add a Weather Card to show current temperature and precipitation.
- Add a Log Card to show the last time the pump ran.
Conclusion
By combining ESPHome for the hardware, Node-RED (whether in K8s or as an Add-on) for the logic, and Home Assistant for the visualization, I’ve created a garden watering system that is robust, local, and incredibly easy to manage.
Whether you prefer the scalability of a Kubernetes cluster or the simplicity of the Home Assistant Add-on, this architecture gives you the power to build a truly custom smart home experience.
If you found this post helpful, I’d be very grateful if you’d help it spread by sharing it.