
This tutorial will guide you through the process of transforming a regular photograph into a vibrant, comic-book-style pop art image using the powerful ComfyUI interface. The workflow demonstrated is a “context” or “style transfer” setup, where an existing image (the reference) provides the artistic style for a new image (the subject).
Understanding the Goal
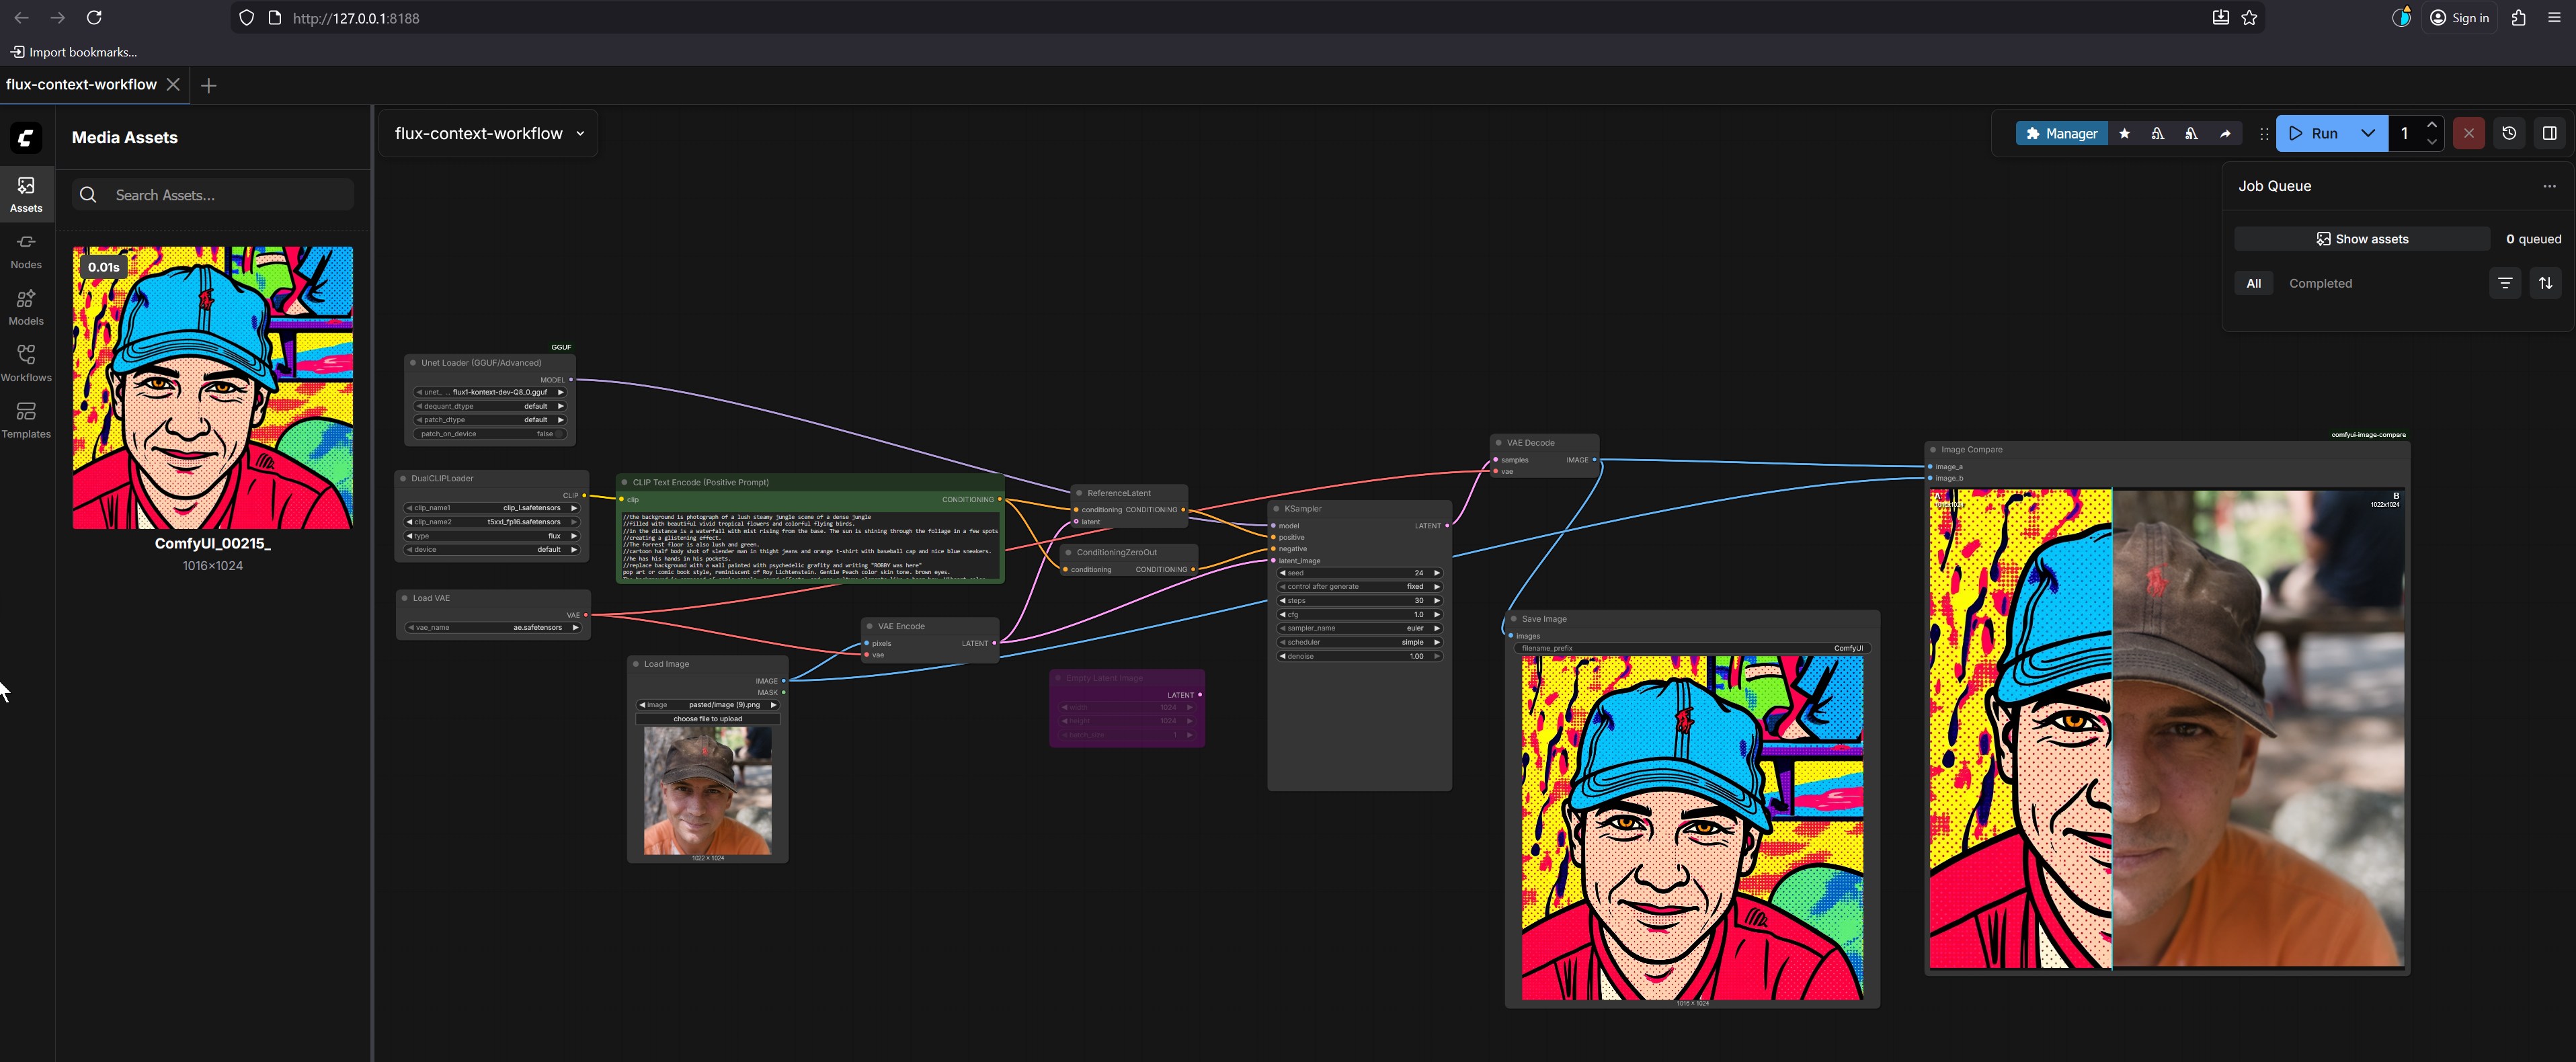
The final result, visible in the Image Compare and Save Image nodes, is a split-screen image:
- Left Side: A stylized portrait of a man with a blue cap, rendered in a bold, colorful pop art style.
- Right Side: The original photograph of the same man.
Our goal is to replicate the artistic style from the reference image (the pop art portrait) onto the subject image (the photo).
How to Install ComfyUI
ComfyUI is a powerful, node-based interface for Stable Diffusion models. Here’s how to get it set up on your computer.
Prerequisites
A computer with a reasonably powerful GPU (NVIDIA or AMD).
Python 3.10+ installed.
Git installed.
Step 1: Install ComfyUI
Open a terminal (or command prompt) and run the following commands:
# Clone the ComfyUI repository from GitHub
git clone https://github.com/comfyanonymous/ComfyUI.git

# Navigate into the ComfyUI directory
cd ComfyUI
Step 2: Install Dependencies
You will need to install the required Python packages. The easiest way is to use pip.
# Install the required packages
pip install -r requirements.txt
Step 3: Download Models
ComfyUI needs several models to function. You must download them manually.
Stable Diffusion Model: This is the core AI model.
- You need a Stable Diffusion model file (
.safetensorsor.ckpt). The most common one isflux-1-dev-fp8.safetensors. - Download it from Hugging Face or another trusted source. For example:
- Place the downloaded file in the
models/checkpointsfolder within your ComfyUI directory.
- You need a Stable Diffusion model file (
VAE Model: The VAE (Variational Autoencoder) is used for encoding and decoding images.
- You need a VAE model, such as
vae-ft-mse-840000-ema-pruned.safetensors. - Download it from Hugging Face or another trusted source. For example:
- Place the downloaded file in the
models/vaefolder within your ComfyUI directory.
- You need a VAE model, such as
Step 4: Run the following command to start ComfyUI:
# Start ComfyUI
python main.py --listen 127.0.0.1:8188 --listen-port 8188
This will start ComfyUI on your local machine at
http://127.0.0.1:8188.Step 5: Access the Web Interface
Open a web browser and go to http://127.0.0.1:8188. You should see the ComfyUI interface.
Step-by-Step Example: Creating Pop Art from a Photo
Let’s walk through the entire process with a specific example.
1. Launch ComfyUI and Load the Workflow
Open your web browser and go to
http://127.0.0.1:8188.Click on the
Workflowstab in the left sidebar.Find and click the
flux-context-workflowto load it into the main graph.2. Prepare the Reference Image (Style)
The reference image is the source of the artistic style. In this case, it’s the pop art portrait.
In the
Media Assetspanel on the left, locate the image namedComfyUI_00215_. This is your reference image.Action: Drag and drop this image from the
Media Assetspanel into the main graph area. It should automatically connect to theUnet Loadernode.3. Prepare the Subject Image (Content)
The subject image is the one you want to transform.
In the
Media Assetspanel, find the photo of the man wearing a brown cap.Action: Drag and drop this image into the main graph area. It should connect to the
Load Imagenode.4. Configure the Text Prompt (Positive Prompt)
The text prompt describes the desired content and style. The prompt is already provided in the CLIP Text Encode (Positive Prompt) node.
Action: Double-click on the green
CLIP Text Encode (Positive Prompt)node to edit the text.The prompt reads:
/the background is a photograph of a lush steamy jungle scene of a dense jungle
//filled with beautiful vivid tropical flowers and colorful flying birds.
//as the distance is a waterfall with mist rising from the base. The sun is shining through the foliage in a few spots
//creating a glittering effect.
//The reference image is also lush and green,
///a cartoon half body shot of slender man in tight jeans and orange t-shirt with baseball cap and nice blue sneakers.
//He has his hands in his pockets.
//Replace background with a wall painted with psychedelic graffiti and writing "KERRY was here"
//pop art or comic book style, reminiscent of Roy Lichtenstein. Gentle Peach color skin tone, brown eyes.
Explanation: This prompt is very detailed. It instructs the AI to:
- Create a jungle background (which will be replaced).
- Describe the subject’s appearance (slender man, jeans, t-shirt, cap).
- Replace the background with graffiti.
- Apply the style of Roy Lichtenstein (a famous pop art artist known for bold lines and halftone dots) to the entire image.
### 5. Run the WorkflowAction: Click the
Runbutton in the top-right corner of the ComfyUI interface.The workflow will execute step-by-step:
- The model (
flux-context-dev-Q8.gguf) is loaded. - The reference image’s style and the subject image’s content are processed.
- The text prompt is used to guide the generation.
- The AI combines all these elements to create a new image that matches the subject and content of the photo but in the artistic style of the reference.
### 6. Review and Save the Result- The model (
Action: After the process completes, click on the
Save Imagenode.A preview of the generated pop art image will appear. You can see it in the
Image Comparewindow, where it is displayed side-by-side with the original photo for comparison.Explaining the Node Setup
The power of ComfyUI lies in its modular node-based system. Each node performs a specific function, and they are connected to form a complete workflow. Let’s break down the key nodes in this flux-context-workflow.
1. Unet Loader (GGUF/Advanced)
Function: This is the core of the AI model. It loads the Stable Diffusion model (
flux-context-dev-Q8.gguf) into memory. The model is responsible for generating the final image based on all the inputs.Why it’s important: Without this node, there is no AI to generate anything.
2.
Load ImageFunction: This node takes a standard image file (like a JPEG or PNG) and loads it into the pipeline as an input for processing.
Why it’s important: It’s how you introduce your subject photo (the man in the brown cap) to the workflow.
3.
CLIP Text Encode (Positive Prompt)Function: This node takes a text string and converts it into a format that the AI model can understand. The model uses this encoded text as a guide for what to generate.
Why it’s important: This is where you give the AI its instructions, such as describing the subject, the background, and the style.
4.
VAE EncodeFunction: The VAE (Variational Autoencoder) is a component of the Stable Diffusion model that handles encoding and decoding images. This node takes the input image (either the reference or the subject) and converts it into a “latent” representation.
Why it’s important: The AI model works in a lower-dimensional space called “latent space.” This node is essential for converting the real-world image into a form the model can process.
5.
KSamplerFunction: This is the core “engine” of the workflow. It uses the loaded model, the encoded images (reference and subject), and the text prompt to generate a new image. It performs the complex calculations that turn all the inputs into the final output.
Why it’s important: This node does the actual “generating.” You can adjust its parameters like
steps(how many times the AI refines the image) andcfg(how closely the image follows the prompt) to control the quality.6.
VAE DecodeFunction: This is the reverse of the
VAE Encodenode. It takes the generated latent image from theKSamplerand converts it back into a standard image format.Why it’s important: The AI generates an image in a compressed form. This node decodes it so you can see it as a regular picture.
7.
Save ImageFunction: This node saves the final generated image to your computer’s hard drive.
Why it’s important: It allows you to keep the results of your work.
How to Modify the Prompt for Different Styles
The prompt is the most powerful tool for controlling the final output. By changing the words and phrases, you can create images in countless different styles.
1. Understanding the Prompt Structure
The prompt in the image uses a specific syntax:
/the background is...: This is a negative prompt. It tells the AI what not to include.//The reference image is also lush and green,: This is a contextual hint. It instructs the model to apply the style of the reference image.///a cartoon half body shot...: This describes the subject and content.//Replace background with...: This is a direct instruction.//pop art or comic book style, reminiscent of Roy Lichtenstein.: This is the style descriptor.The style descriptor is the most critical part for changing the final look.
2. Changing the Style Descriptor
You can modify the prompt by changing the style descriptor. Here are some examples:
To create a watercolor painting:
//watercolor painting, soft brushstrokes, vibrant colors, impressionist styleTo create a digital illustration:
//digital illustration, clean lines, vibrant colors, anime styleTo create a photorealistic image:
//photorealistic, high detail, 8k resolution, cinematic lightingTo create a surreal dreamlike image:
//surreal dreamlike, melting clocks, distorted perspective, ethereal atmosphere
3. Changing the Subject and Content
You can describe different people or objects.
From a man to a woman:
- Change
a cartoon half body shot of slender mantoa cartoon half body shot of a beautiful woman.
- Change
From a person to an animal:
- Change
a cartoon half body shot of slender mantoa cartoon full body shot of a majestic lion.
### 4. Changing the Background- Change
You can describe different settings.
- From a jungle to a cityscape:
/the background is a photograph of a bustling city skyline at night
//filled with bright neon lights and towering skyscrapers.
5. Use Negative Prompts
Negative prompts are crucial for removing unwanted elements.
To avoid blurry images:
/blurry, low quality, distorted faceTo avoid common AI artifacts:
/deformed hands, extra fingers, malformed eyes
6. Use Weighting and Grouping
You can use parentheses to give more weight to certain words.
Increase the importance of “pop art”:
(pop art:1.3), comic book styleThis tells the AI to pay 30% more attention to the “pop art” style.
Group related ideas:
(vibrant colors, bold lines, halftone dots)
Tips for Prompting
- Be Specific: The more detailed your prompt, the better the results.
- Use Descriptive Words: Use words like “vibrant,” “detailed,” “cinematic,” “realistic,” “dreamlike.”
- Experiment: Try different combinations of words and styles. There’s no one right answer.
- Iterate: Run the workflow multiple times with slight changes to the prompt to see what works best.
By mastering prompt modification, you can unlock endless creative possibilities with ComfyUI.